You asked for a better ear exam, and we heard you. The beta version of the new otoscope that you now hold in your hand is designed for better usability and patient experience. You are one of a select few physicians chosen for field testing the new otoscope. We’re counting on you. Please help us make proactive improvements by reporting to us any bugs or usability issues that you encounter so that we can fix them before sending the new otoscope to your patients.
In case you’re asking yourself the following questions:
How long will it take to set this up? Literally, just 5-10 minutes.
Is it safe to connect my phone to this otoscope? Yes, the otoscope connection is fully secure.
Why do I have to connect the otoscope to my phone via WiFi? We searched and found that the best technology to improve the Nonagon otoscope requires using a WiFi connection. In order to beta test it, and thereby provide an optimized experiance to your patients, it will require a few steps on your part — but once you set it up the first time, that’s it.
iOS or Android user?
iOS
Android
iOS
How to add the Nonagon 2.0 beta app to your iOS device?
Follow these steps to download Nonagon’s beta app via TestFlight.
Step 1: Once you receive an email called “Nonagon Ltd has invited you to test Nonagon DEV.”, go to the iOS App Store. TestFlight -> Get.
Step 2: Tap “Allow.”
Step 3: Tap “Continue.”
Step 4: Tap “Open.”
How to connect the otoscope to your iOS
Follow these next steps to connect the otoscope to your iOS.
Step 5: Uncap the otoscope to turn it on. A blue light should flash.
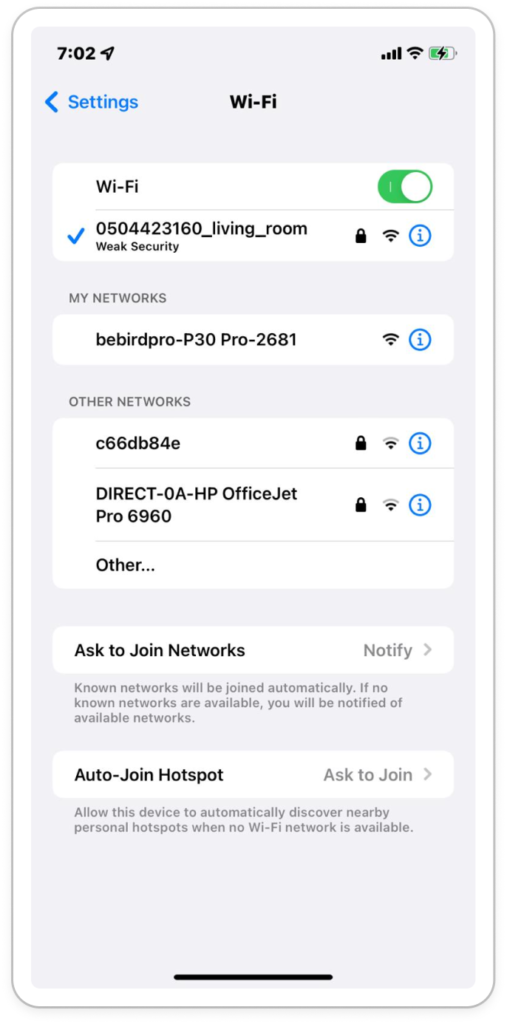
Step 6: Open Settings -> Wi-Fi. Write down the exact name of the network starting with “bebirdpro…” paying special attention to capitalization and hyphens. Then, exit Settings.
Step 7: Open your Nonagon app and tap the hamburger menu.
Step 8: Tap “Settings.”
Step 9: Scroll down and tap near the letters “SSID.”
Step 10: When the pop up appears, enter the Wi-Fi info you recorded earlier and press save. You are now connected! Close Settings.
Android
How to add the Nonagon 2.0 beta app to your Android device?
Follow these steps to download Nonagon’s beta app via DropBox (Beta version is applicable for offline mode only).
Step 1: Once you have recieved a welcome email called, “Account successfully created,” uninstall the Nonagon app from your Android device (if you have it installed) to make room for the new app.
Step 2: Open the welcome email called “Account successfully created” and tap the link. In Dropbox, tap “Or continue to website” to access the download file.
Step 3: Tap “Download.”
Step 4: Access the downloaded file by tapping “Details” in the pop up, or by going to your phone’s “Files” folder and then click Recents -> Downloads.
Step 5: Tap on the app file to begin installation.
Step 6: If you are prompted to change your security settings, tap “Settings.” Otherwise, skip to step 8.
Step 7: Tap the toggle switch on to allow the app to install.
Add Your Tooltip Text Here
Step 8: Tap “Install.”
Step 9: The Nonagon Beta app is installed. Tap to open it.
How to connect the otoscope to your Android
Follow these next steps to connect the otoscope to your Android.
Step 10: Uncap the otoscope to turn it on. A blue light should flash.
Step 11: In the Nonanagon app -> Menu -> Ear exam -> External otoscope.
Step 13: Tap “Connect”.
Step 14: The app will attempt to connect to a Wi-Fi network starting with the text “bebird…” If it succeeds, you are ready to use the new otoscope and may skip steps 4 and 5.
Step 15: Wait for the phone’s settings to open automatically. Click “Allow permission.” Close settings, and return to the Nonagon app.
Step 16: This time, the app should connect to “bebird…” Wait for it; and then continue to the “How to use the external otoscope” section below.
How to use the external otoscope?
Login to the Nonagon app.
Open your Nonagon app -> Menu. Then, open the ear exam.
Uncap the otoscope to turn it on. A blue light will flash.
When prompted to join the “bebird…” network, click “Join.”
Ear exam: Attach the speculum and disinfect it.
Start ear exam-Tap on the video icon.
To disconnect-Recap the otoscope to disconnect and turn it off.
Currently out of stock
Submit your email, and we will inform you when it will be back in stock